Showing posts with label image bank. Show all posts

Monday, 5 October 2015

Multiple exposure - image bank

Multiple exposure:


In the image above two photos have been taken and merged together to create an effect. The background photo is of trees and the sky, and the photo this  is merged into is of a girls face. The effect that is given is a more abstract style of portraiture and scenery. The image blow demonstrates this but with a building as the second photo instead of the trees the effect works just as well and is a good technique to use to show a building but create an atmosphere with the use of the face. 


In the image above the use of the people with the image of the city in them is a creative twist. This image is a wedding photo that has incorporated a night time scenery into it. This idea shows how you can incorporate multiple exposure into general uses of photography to make them look more exciting and more original. This idea is something that i would like to use in my photography project.


The image above is a simple example of multiple exposure, you can see this clearly at the edge of the photograph where the shape of the trees is beginning to come through. The photograph is effective as its interesting to look at and makes people look closely at the image to be able to tell what it is. 


Above is a different way of showing multiple exposure in photography. This way you can see the background image a lot more clearly and the image that is placed on top is left to make a more subtle effect. This works in this cases as the overall effect of the image is still clear. In this image its used to show someone that wants to hide their face, yet the use of multiple exposure is still allowing their faces to be seen.


The image above is again a different style of multiple exposure, the same technique is used where two photos have been layered on top of each other to form one image. This time instead of using a persons face of outline of their body. This is a effective as it is a more creative way of showing multiple exposure that is more original. 


Monday, 21 September 2015

High key photography - image bank

Hight key photography -  image bank:


Above is an example of a high key photography. The background in this image is important as the white background yeps to enhance the light and to reduce the shadow that is made. The object is well lit with there being no harsh lines. Its a good technique to use to show contrast as they are clear and well defined. This is effective when photographing faces as you can see the features of the face clearly and well defined. 


In the image above high key has been used to clearly show the definition of the rose. This is achieved as you can clearly see each of the petals of the rose and how the fit together. The shape of the rose is obvious as well defined meaning the high key effect has worked. The whole thing being photographed in white helps to equalise the colour to help to show each petal. 


The image above is another example of high key photography being used on people. The use of the high key takes all of the colour out of the photograph and 
allows you to focus on the details. In this photo you focus on the eyes of the child and let them stand out.


In the image above the high key helps the eyes and eyebrows to standout. The colour is equalised making those parts stand out more. This would be a good technique to use when looking at beauty or in my case style as you ca  focus on certain parts of the face or clothing to help to make them standout or noticed. 

Wednesday, 5 August 2015

Multiple imagery - image bank

Multiple imagery - image bank:


The image above is a multiple imagery of one person that has been photographed at different angles and then mixed around in a multiple imagery. This is a more interesting way of showing some photographs and is more entertaining for the eye.  It a more creative way for photographers to show their work.


The image above is a less obvious multiple imagery but is still a multiple imagery. Again this is a more creative way to show the photographs and to show scene. I would like to attempt something like this in my project as i think that its very creative and breaks away from the typical multiple imageries.


Above is another example of a typical multiple imagery and has been used to show the picture of the tree in a more interesting way. This is achieved as the tree has been distorted for the image to be achieved and more exciting.


The image above is an example of a multiple imagery being used as a part of a sequence. This is effective as you can tell stories and show journeys with you image. i think this is something i would like to do with my project as it would be an new thing to do when looking at multiple imagery.


The two images above and below show a multiple imagery being used as a sequence again but this time it being a fluid sequence that progresses into the next image. In the image above the different shape adds to the originality of the image. The image below is effective because of the transformation in colours. This is a interesting style to look at as its different and is a creative way to look at colours of the same scene.


Monday, 6 July 2015

Multiple flash - image bank

Multiple flash - image bank:


The images above and below are two examples of multiple flash. In these images you can see the arms and object move from each stage in the photo. This is another way of showing sequence photography as you can clearly see each stage move on.


In the two images above and below the transitions are not as clear but still work to show the sequence. In the image above the use of colour helps to make the transition standout and to see the different parts of the photo and see where each separate flash has been taken. The same happens below where you can see all of the arms of the girl, this is effective as its a creative look on this photograph.


In the image above you can see the sections of the different cards. Again this is creative as it looks as though there are many cards falling where there's only one. The image below shows facial expressions on one man, you can see that after each flash he has moved and pulled a different face.


Saturday, 20 June 2015

Close up - image bank:

Close up - image bank:


In the images above and below the use of close up has allowed the photographer to capture a immense amount of detail in their images.  In the image above the use of close ups mean you can see the gains in the leaf as well as where the light is hitting the water bubbles.  In the image below the close up enables you to see the small hairs on the spider and to be able to see all of the details on it. The blurred background in both of the images helps to focus on the small main parts of the image.


In the images above and below, the close up takes up the majority of the frame. In the image above this helps to show the small fur of the cat as well as the light that is shinning into the cats eyes. These are details that wouldn't be as clear if the shot wasn't a close up.  In the image below the close up shows the ripples in the water, as well as the small drip that is falling. This is again made clearer through the use of close up.


In the two images above an below close has been used to show texture in photography. In these images, the use of the close up means you can focus clearly on the texture adding a new feel to the image. It allows you to get an even more accurate representation of what is being portrayed. In the image above the use of dark lighting allows the small amount of light thats focused on the one area make that area standout, the use of closeup onto this area makes it seem as if you could actually reach out and feel whats in the photograph. In the image below the use of close up highlights the texture of the strawberries. You can see the difference between the red and the yellow in the strawberry creating the texture of the photo.


Thursday, 18 June 2015

Wide angle - image bank:

Wide angle - image bank:


In the image above wide angle has been used to show a length of a building in full. The photographer has been able to show the whole length of the building and has been able to include some of the details in this. In doing this the details of the photo have been made smaller as you are no longer focussing on these small details but the angle the use of wide angle to be effective.


In the two images above and below wide angle has been used to be able to show heights in photographs. In the top image the whole height of the buildings have been shown, however to be able to do this the buildings look distorted and stretched. This is so that you can try to avoid angling the camera and changing the perspective of the picture. In the picture below the camera has been placed at a angle to help to show the whole length of the eiffel tower. In doing this the image looks elongated but the use of wide angle helps to keep some perspective.


In the image above the use of wide angle has helped to create a sense of depth in the photo. This is effective to cover a wide surface area in the photo, as well as including the details with the stones. The use of wide angle in this image helps to make the details at the front of the frame stay close and focused, while the details at the back of the frame become more blurred and distorted.


In the image above wide angle has enable the photographer to capture a overview of big ben. In doing so the image looks a little distorted. This is shown when the main length of the tower appears to be squashed. In the image below the wide above angle shot gives a interesting twist onto a photo of a couple. The image below demonstrates this capturing the moment but not being focused closely on details and facial expressions. 


Image within image - image bank

Picture within a picture - image bank:


In the two images above and below the frame has been used to outline an area where selective colour is being used. The first photo shows the use of selective colour within the frame. This helps to make the background within the frame standout and make the overall effect of the picture within a picture appear to be more effective. In the image below the same effect works to make a certain area of the photo standout more than another.


In the image above the picture within a picture is a creative way to show two different images together. This way of showing this two photos allows the different photos to be in the same image. This is a way to include all family members in the same image as well as being able to compare old photos with new photos.


In the two images above and below, the use of photo within a photo has been used to compare an old photo with a more modern setting. This is a way of comparing a new to old scene in photography. This works in the first image as the photo being held in the scene is placed over the same place at a more current time, it is able to show how the place has aged over some time. The photo being held in the image below is showing a recreation of a scene. Its able to show the scene looking the same.


In the image above a drawing has been photographed over a dog, the photo has then been taken to capture this.  This is  an original idea of showing picture within a picture as it includes a more artistic take. This is a more creative and way of showing this idea in photography.

Tuesday, 16 June 2015

Sequencing photography - image bank:

Sequencing photography - image bank:


In the beginning 3 photos sequencing has been shown through a series of images all been put together to make one photo. This sequence is a action sequence as you can clearly see each part of the action that is taking place. These are effective as they can show a journey progress and develop.
I have chosen to include this image because i think its a direct example of a sequencing photograph. The idea of the sequence is simple and clear to notice making it easy to see it. The photograph shows something as a moving sequence as you can se the progress of the runner jumping over the hurdle.


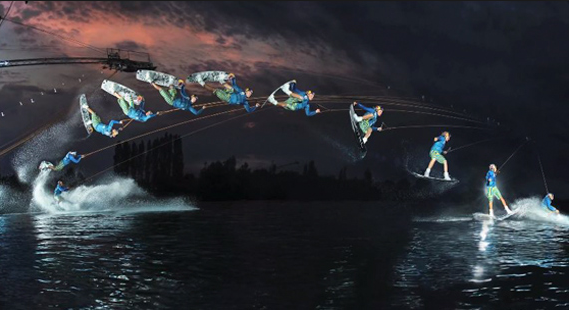
In the two photos above and below a sequence is being shown with water sports. They show the different points of the sport and showing the different heights. This is a simple and effective way of showing how the sport works and the heights they can reach. This is a fun way of exampling the sport as well as a fun thing to photograph.


In the three images below he sequence has been shown in a number of photographs. This enables you to see each part of the sequence separately. 


In the two images above and below the use of multiple images to show a sequence makes it easy to show the individual stages of the sequence. This way allows for more character to be shown into the sequence as there is more space and opportunity to show more in each individual photo.


In the image below the use of many different images allows you to see in depth what is happening in the sequence. This allows you to see small developments and changes in the photos as the sequence progresses.  This sequence is effective because its a easy way to show the different parts of a sequence, it would work best with larger sequences.


Thursday, 11 June 2015

Location portraiture - image bank:

Location portraiture - image bank:


In the two images above and below, the people in the photographs are the main focus'. while these are not direct portraits they still work as the attention is drawn to the people and the expression they are carrying. Both of these ideas are helped by the use of dark backgrounds and settings. In the image above the small amounts of light coming through the clouds helps to highlight the man in the image. In the image below the completely plain background puts emphasis on the women standing in front of it making her standout. 


In the image above the blurring of the background helps to make the girl standout. The same is done in the image below. By doing this you are able to get a small idea about the location of the photo but not an in-depth one. This helps to focus on the actual person in the picture instead of the scenery behind them.


In the two images above and below the complete blurring of the background gives no idea of the background behind it. This means the sole focus of the image goes onto the people in the photographs making them the main attraction. This achieves the goal of only looking at what the person is doing or the emotion that expressed on their face.